
Throughout their lives, hermit crabs go through a large sum of shells to fit their ever-growing bodies. This makes it very important that you provide your pets with a variety of clean shells to choose from.
With that comes a big issue: shells left in a humid environment will form some grime and nasty bacteria. On top of that, hermit crabs love to dirty up the insides of unused shells with tank substrate, uneaten food, and even their waste! Yuck!
This was the case for me in my crabitat, so now I’m going to give my hermit crab shells a thorough cleaning. Let’s go over how I do it.
Step 1: Gather Your Shells & Materials
It’s very easy to clean hermit crab shells. To start, gather all of the shells in your hermit crab tank. This surprisingly takes longer for me than most other crab owners because my pets like to bury their extra shells. Be sure to look inside each shell and make sure there isn’t a crab hiding in the back. I use a medium-sized plastic bowl I don’t mind coming into contact with hermit crab germs, and I recommend you do the same. Call me a germaphobe, but hermit crabs aren’t the cleanest creatures.
To clean your hermit crabs, you’re going to need a:
- A Ceramic or Stainless Steel pan – Avoid any non-stick pains with chemical coatings. These can release toxins and harm your hermit crabs.
- A strainer – A sturdy strainer large enough to hold all your shells is essential. It makes rinsing your shells so much easier. A metal or plastic strainer will do just fine.
- A pair of Tongs – From experience, the easiest tool to pick shells out of boiling water is a pair of tongs. Spoons scoop the water with the shells, leading to a hot steamy mess!
- Plenty of paper towels. – Cleaning shells can get messy, and drying them with paper towels saves some time. Be sure to stock up on them! An old towel or rag will also do just fine.
Step 2: Rinse & Scrub Your Shells
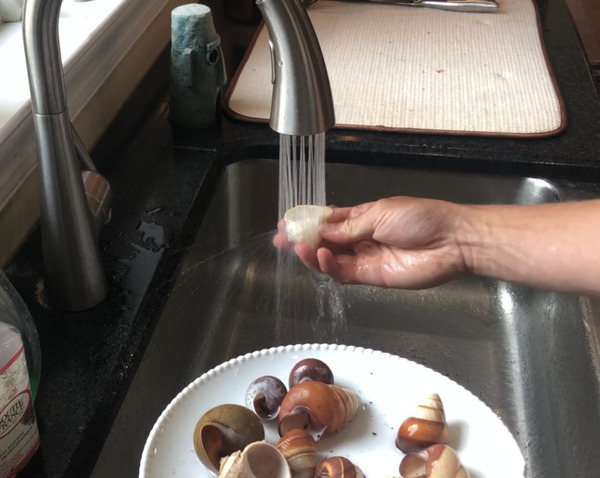
Now we’re getting down to business! Picking from your bowl of dirty shells, take one at a time and rinse off any noticeable specks of dirt and grime. This will do a great job taking care of any substrate that has clung onto your shells.
Even after a good rinse, your shells may still feel slimy and dirty. To combat this, take an old toothbrush and start scrubbing! You don’t have to overdo this, just have a goal for 20 to 40 seconds of brushing per shell. Focus on any divots, crevices, or indents in the shell where grime likes to build up.
This is where cleaning shells can get tedious, and some people tend to rush. While you’re sitting there scrubbing, remember how thankful your hermit crabs will be for such clean and livable shells.
As you scrub your shells, place each clean one in a glass or ceramic pot. Yes, you guessed it! Next, we’re going to boil your shells.
Step 3: Boil Your Shells
If you haven’t already, take a pot and fill it with your hermit crab shells. If you have too many, split the bunch into separate batches.
Next, fill the pot or pan with just enough non-chlorinated water to submerge the shells.
It’s optional, but you can try adding 1-2 tablespoons of aquarium salt (not table salt!) to the water. Boiling shells in saltwater will leave a tiny salty residue on the insides of the shells which your crabs would love.
Instead of boiling, you can dip already-boiled shells in a saltwater solution for 30 seconds or so. It’s just a normal solution you’d see on the back of a box of Instant Ocean (an Amazon link to the aquarium salt I use). It’s priced fairly and very effective.
Keep an eye on the pot and bring it to a boil, then lower heat to a simmer for 15 minutes. This will kill any germs or bacteria on the outside and inside of your shell. Gently stir every 5 minutes.
After a bit, you’ll see bits of brown float around the shells. This is substrate and hermit crab feces that got caught at the top of the shells. This is why you’re cleaning them!
Sometimes I make the mistake of not adding enough water which tends to make the water level drop below the shells. Add more water if this happens, just be careful not to pour cold water directly on an exposed shell. The intense cold could can the shell to crack.
Step 4: Strain & Dry The Shells
Once your shells have simmered for a good 15 minutes, it’s time to take them out. Gently pour the pot’s contents into a strainer, being careful not to break the shells. Sometimes it’s a good idea to use a spoon to fish out a few fragile ones- just be careful not to burn yourself.
Once they’re in the strainer, rinse your shells with cool water. This will make them safe to touch and dry.
From there you can either leave your shells out air dry or pat them down with a paper towel. To each his own, but I prefer patting them down with paper towels if I have the time and willpower.
Afterward, leave your shells out for 30 minutes or so to cool.
Step 5: Put Them Back Where You Found Them
Once your shells are room temperature and dry, it’s time to put them back in your crabitat. Make sure the mouth of the shell is facing upwards so your crabs can try them on. This will also result in less substrate being kicked in your shells.
Try to keep your shells in a designated area. This makes it easier to keep track. Some owners say that it will make your crabs even more interested in trying them on. It couldn’t hurt.
Congratulations! Your Shells are Clean!
It’s over. Hallelujah! With your shells back in place, your crabs will be satisfied. It’s a good idea to clean your shells every month or two, depending on how often they are tossed around. If there’s ever an infestation of mites or another parasite in your habitat, you should clean your shells again.
But hey! Don’t worry about it. Put your feet up and relax. Your hermit crabs will love their clean shells.
If you’re interested, I have plenty more to say about cleaning hermit crab shells. Let’s get into how you shouldn’t clean shells, common shell cleaning misconceptions, and more.
NEVER use bleach to clean your shells!
There are plenty of ways to disinfect your hermit crab’s shells. My favorite is the boiling method, others have their own, just never use bleach.
Sure, it cleans the shell. It also takes away the shell’s beautiful natural color and makes it reek of chemicals. What hermit crab would want to live in something like that?
Worst of all, even the smallest traces of bleach in a shell can poison your hermit crabs. DO NOT USE BLEACH!
It drives me nuts that people buy all-natural cleaners for their homes, but still bleach their hermit crab shells. As you can tell, it’s one of my many pet peeves.
Do Your Hermit Crabs Have Enough Shells?
As they grow, they move from one shell to the next to fit their ever-growing bodies. In the wild, competition is stiff on who gets the next largest shell for both land and aquatic hermit crabs.
It shouldn’t be that way in your hermit crab enclosure. For every crab in your enclosure there should be 2 vacant shells somewhat larger, and another just a little smaller than your crab’s current shell.
Want to Clean Hermit Crab Shells Found on The Beach?
Well, first I would advise against it. Hermit crabs have stiff competition with tourists who are taking their shells home as souvenirs, but I admit I’ve taken home my fair share of pretty shells.
Before you do so, do your research to make sure that the beach you’re taking from is clean and allows people to take home shells. Along with that, look deep inside each shell you collect to make sure there isn’t a tiny hermit crab hiding in the back. Marine hermit crabs will hide deep in the belly of their shell, only to reappear a few hours later confused as to where the ocean is.
To clean the shells, the boiling method above works just fine. Just keep in mind that some shells you keep might smell bad or crack, you’ll have to throw these away. I’ve been told that it has something to do with the buildup of the shell, but I’m not sure.
Here’s a great article on cleaning seashells from the beach. The article is very straightforward, just be sure to not use the mineral oil mentioned in the last step. This can harm your hermit crabs.
They prefer a shell that feels more natural. Processing your shells may make them last longer, but they’ll lose their natural touch.
Shell Cleaning Misconceptions
There’s some information on the internet about cleaning hermit crab shells that are simply untrue. Some will cause your shells to melt away into nothing, others will turn it into a biohazard for hermit crabs.
If you take anything away from this article, let it be that boiling shells is the best way to clean them. It’s the only way to remove bacteria while keeping the shell intact.
By searching ‘how to clean a hermit crab shell’ on Google, I found 2 ways people recommend cleaning shells that are absolutely terrible for your hermit crabs:
#1: Soaking the shells in a 50/50 mix of bleach and water for several days
#2: Soaking the shells in a 50/50 mix of vinegar and water for several days
Who comes up with this stuff? NEVER attempt to clean your shells with bleach or vinegar. I mentioned before that bleach ruins a shell’s look and livability. Even trace amounts of bleach can poison your poor little hermit crab.
Vinegar is even worse: it’ll melt the shell away into nothing!
This is only if you leave the shell in a vinegar solution for long periods. Just keep in mind continuous cleanings will wear away at your shell, making it too fragile for your hermit crab. Hermit crabs have been known to modify the insides of shells to their liking, which already makes your shells very fragile. Just a few hours in vinegar could mean an end to their calcium-based greatness.